Digital Signage with Raspberry Pi.
Step-by-step guide on building an easy to use, plug-and-play digital signage solution for your business.
This guide covers the process to create a relatively cheap digital signage solution that is scalable and very easy to use. This guide assumes you are using the latest version of Mac OS X (Mavericks), a guide for Windows will come later.
Total Cost: ~$165 Total Time: 30min-1:30 (Depends on how comfortable you are with terminal commands)
Setup:
Everything can be found on either Amazon or Newegg. Of course bundles exist and make the total cost slightly lower. However, make sure to purchase quality SD Card (like San Disk), Micro USB, HDMI, and Ethernet cables as well as a quality Wireless Wi-Fi adapter.
- Raspberry Pi Model B: $35
- Raspberry Pi Case: ~$10
- Micro USB cable (Not wall charger): ~$5
- USB (no Bluetooth/Wi-Fi) Keyboard: ~$6
- USB (no Bluetooth/Wi-Fi) Mouse: ~$5
- 8GB SD Card: ~$6
- Wireless Wi-Fi Adapter (I used EDIMAX EW-7811Un): $10
- HDMI Cable: $8
- Ethernet Cable (lying around…)
- LCD Screen with HDMI and USB inputs: ~$80
- SD card reader (should be on your computer)
- A Rise Vision account: FREE
Installation Guide:
1. Installing the Raspbian image on the Raspberry Pi’s SD Card
For simplicity, it is recommended to clear your Downloads folder before beginning – you will understand why in the following steps. Do not insert your SD card into your computer before the next couple of steps. Next, we will be downloading the latest image of Raspian Wheezy here inline link. and unzip it within the Downloads folder.
Now we will be running some commands in the Terminal app, which can be found under Utilities in your Applications folder. When you have opened up Terminal, run the following command to navigate to the Downloads folder:
cd ~/Downloads
Now run the following command to verify that you have both the zip and img file in the Downloads folder:
ls
This is what should come up:

Before inserting the SD Card, we need to understand your device’s layout by running the following command:
df –h
The output should look like this:

Now insert your SD Card (making sure it is read by your computer) and run the same command again. Now you should see this:
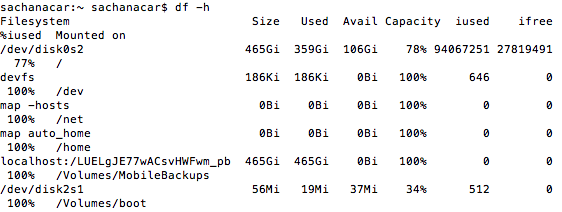
Note the new “/dev/disk2s1” line, your new line might be different but keep the last part (like disk2s1) handy. We will first unmount that volume using:
sudo diskutil unmount /dev/disk2s1
You will be prompted for your password, which you cannot see as you type so type slowly and then press enter to confirm. You should now see:

If you are not inside the Downloads folder, navigate to it using:
cd ~/Downloads
We can now write the Raspbian image onto it using the dd tool. Whatever your disk was named (e.g., /dev/disk2s1), remove the “s1” and add “r” in front of “disk” – “/dev/disk2s1” becomes “/dev/rdisk2”. The command you will run will look like this:

sudo dd bs=1m if=IMAGE-FILE-NAME (found in your Downloads folder e.g. 2014-01-07-wheezy-raspbian.img) of=/dev/YOURDISKNAME (more likely rdisk2).
In my case:
sudo dd bs=1m if=2014-01-07-wheezy-raspbian.img of=/dev/rdisk2
It will take a while to complete and output looks like:

Now eject your SD card safely and insert it in your Raspberry Pi.
2. Booting and Configuring the Pi
Troubleshooting: if your screen does not display your Pi’s image, remove the power source, then the SD card. Insert the SD card back into your computer’s SD card reader and open the config.txt file. You will be uncommenting a display safe-mode feature. Uncomment the following line by removing the hash tag in front of it: # hdmisafe=1 becomes hdmisafe=1
Turn on your screen, hook up your HDMI, Keyboard, mouse, Wi-Fi dongle, and SD Card, and then plug in the power source. The first time booting the Pi, you’ll see the following tool to configure your device. It is called raspi-config and can be accessed again by typing raspi-config in the Pi’s terminal. Before continuing with the booting, we will need to change a few options on this Wizard.
First we need to expand the installed image to use the maximum available space on the SD Card. Using your keyboard arrows, select “Expand File System” and press ENTER.
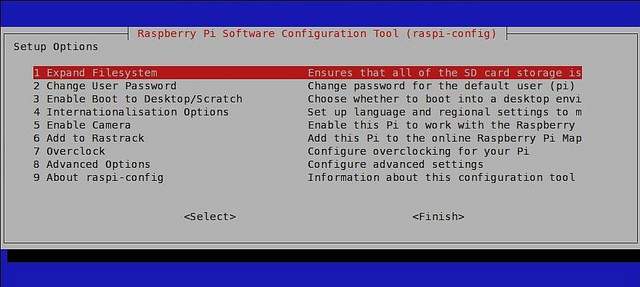
If your screen looks fine, skip the following step. Otherwise we will disable overscan. For this, select “Advanced Options” Then “Overscan” and select disable.
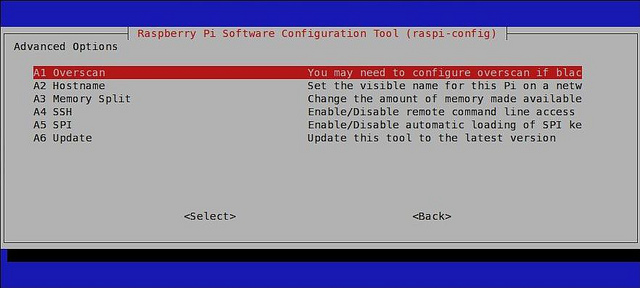
We will now verify your keyboard settings: In “Internationalisation Options” select “Change Keyboard Layout” and press Enter, then choose Generic 105-key (Intl) PC. Then select the appropriate Keyboard layout (depending whether it is QWERTY, AZERTY, Spanish, etc.)
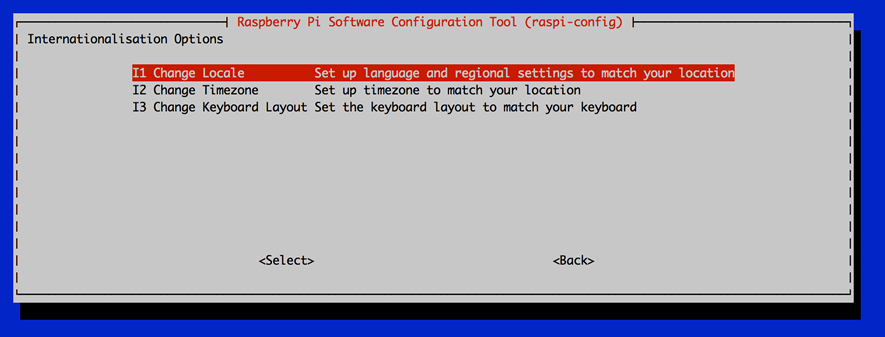
You’ll be asked for modifier key – choose default then “no compose key” on the next screen. You’ll also be asked to set the ALT / CTRL / BACKSPACE feature whenever your GUI crashes so you can safely unfreeze it – answer yes.
Back in Internationalization Options, change timezone: select the timezone you will be using your device in.
Set a user password: Select “Change User Password” and press Enter, and when prompt enter your new user password.

Finally, we will enable the boot to desktop option. Select “Enable boot to desktop: then select “Desktop login as user pi”. Now select FINISH then REBOOT.
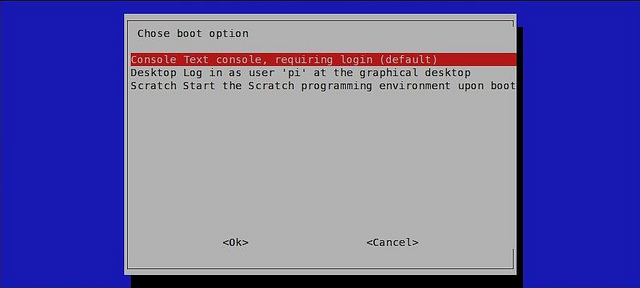
On the next boot you will be prompted for your login: mostly likely pi and password: the one you chose.
3. Setting up the Wi-Fi connection
a. Setting up the Wi-Fi connection (easy) We will setup the WiFi dongle to connect automatically to your network on boot. When your GUI has loaded, navigation to the start menu > Internet > wpa_gui. Launch a scan, identify your network, and enter your network’s credentials. When connected, verify that you can surf the Internet by opening your browser and typing any url.
b. Setting up the Wi-Fi connection (advanced)
Insert ethernet cable and run the following commands:
sudo apt-get update
sudo nano /etc/network/interfaces
Then when in the editor, change the content to:
auto lo
iface lo inet loopback
allow-hotplug eth0
iface eht0 inet dhcp

auto wlan0
allow-hotplug wlan0
iface wlan0 inet manual
     wpa-roam /etc/wpa_supplicant/wpa_supplicant.conf
iface default inet dhcp
The run this command:
sudo nano /etc/wpa_supplicant/wpa_supplicant.conf
In the editor replace content with:
ctrl_interfaces=DIR=/var/run/wpa_supplicant GROUP=netdev
update_config=1

network={
     ssid=“YOUR_SSID”
     scan_ssid=1
     psk=“YOUR_PASSWORD”
     proto=RSN
     key_mgmt=WPA-PSK
     pairwise=CCMP
     auth_alg=OPEN
}
More info on how to input this on here
Remove ethernet cable then:
sudo reboot
By now, the wifi dongle should be blinking as the pi is rebooting.
4. Installing Rise Vision Player
Before installing the Rise Vision Player, create your account. When this is done, navigate over to the Settings tab make a note of the Claim ID Rise Vision generated on the Settings page.
Download the pirvinstaller.sh file here. What it essentially does is run an apt-get update, download the RiseVision installer file from the website, marks the permission to execute it, places the Player in the autostart, and a bunch of other cool stuff like the xscreensaver GUI.
To do this, just run the following couple of commands:
sudo chmod +x pirvinstaller.sh
./pirvinstaller.sh
You will be prompted different questions within the terminal, answer Y and press ENTER to each one.
A window asking you to set Rise Vision Player to run automatically on boot will appear, click yes. Then a new window will prompt you to enter the Claim ID you kept handy.
5. Turn Off Screensaver and power saver settings
Since the pirvinstaller.sh file also installed the xscreensaver app, you can use the GUI to disable blank screen and screensaver. If you are in the RisePlayer presentation mode, press CTRL + ALT + BACKSPACE to return to the desktop and login. Then go to the start menu, select preferences, then Screensaver. In the preference pane, select the “Disable Screen Saver” mode.
6. Removing Chrome’s “Restore tabs” function
Congrats! You have now turned your Raspberry Pi into a highly efficient and easy to use plug-and-play digital signage device. Whenever you want to turn it on/off, simply plug/unplug the power cable. Now the only problem with this is that Chrome will detect this as an unsafe power off and next time you power it on, your browser will have an annoying info bar asking you to restore the previous tabs. To remove this simply press CTRL + ALT + BACKSPACE, navigate to the start menu > Internet > Chromium. This will open a new window. Then open the following url: chrome://flags/ then scroll to “Disable Better session restore” approx.. half way through, and click “Enable” and relaunch Chromehac. Now you can safely unplug!
7. Changing settings after RisePlayer Plug and Play Set up.
(Necessitates keyboard + mouse) To change any settings like the Wi-Fi network so you can connect the Pi to another network, simply press CTRL + ALT + BACKSPACE and navigate to the settings of your choice on the desktop. When you are done, simply unplug the power cable.
Credits and thank you:
